
The Windows context menu is... poorly made.
Third-party software developers adding oil into this dumpster fire aren't helping with it. It's not their fault, though, as there is no common standard and almost no documentation for adding entries to the context menu.
It's safe to say that currently, there's no salvation for it. At the very least, it's working and serving millions of users. The new Windows 11 context menu shows Microsoft keeps pressing onward with their all-time classic: writing new, less friendly, less extensible APIs from scratch, simultaneously piling up layers upon layers of untested code atop the previous versions they can't entirely get rid of due to deep backwards compatibility problems that will inevitably arise.
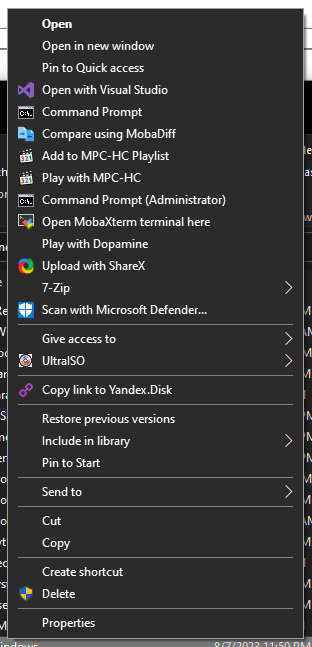
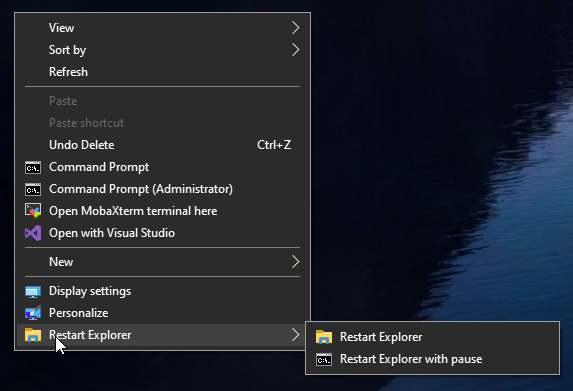
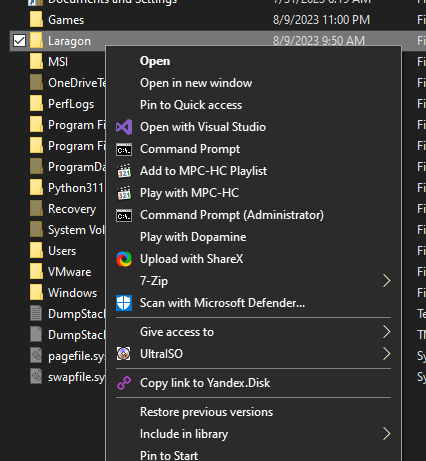
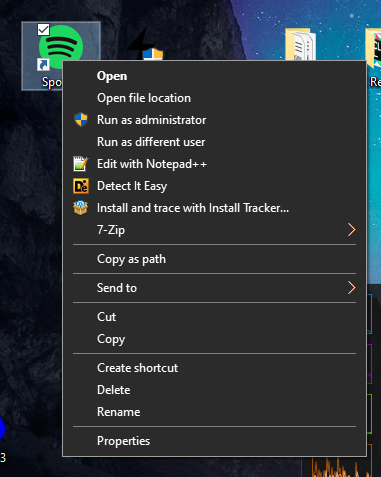
I want to dedicate this article to actually customizing the Windows 10 (incidentally, also 11 Legacy) context menu to your liking instead of just complaining about its inner workings. After reading this article completely, you should be able to bring your menu from this abomination...
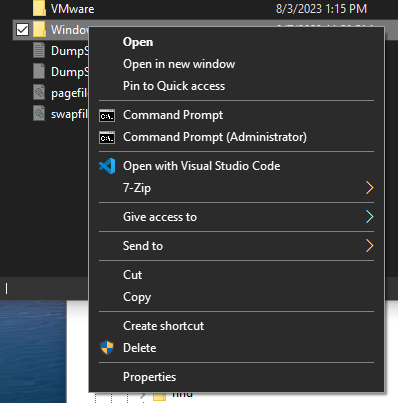
...to this!
Be wary — there's plenty of registry digging involved. And the terrible part is...
Forget any logic when dealing with registry keys. Nowadays, registry structure is the least of all concerns. The idea of using registry as a coherent setting list has long since been abandoned, and nobody seems to care about it, as the end user doesn't. If someone does — they know what they're doing, and they will likely not complain, because they have abused registry the same way at least once. 😉
Whilst there are layers of abstraction applied to the most Windows settings, the context menu is, unfortunately, left aside. And much to our dismay, its backend is also janky, terrible and tangled up. The only fair question to reader from me is «Do you really think it's worth your time?». And if your answer is an astounding «Hell yeah», and you are as much of a perfectionist as I am, buckle up and prepare for several hours of pure joy.

Before we begin
Invoking sfc /scannow or dism /restorehealth will likely interfere with your context menu,
as Microsoft is peculiar — they had customization via direct registry manipulation in mind for more granular control,
but their tools aren't adapted to store so meticulously tweaked settings.
This isn't anything new — that hasn't changed ever since integrity checks were introduced in Windows XP.
No need to worry, though! The aforementioned tools will keep working; however, some of your tweaks might be reset
upon execution.
Context menu components
There are two main components the context menu is composed of:
- Shell entries — provided locally and managed by the registry;
- Context menu handlers — provided and managed by external software.
Neither of them is documented well, but there is some developer documentation for handlers available on Microsoft's website. It explains how they work internally, but that doesn't really help our case. As for the shell entries, I couldn't find anything.
Certainly a shame! Shell entries are so much more flexible and customizable. In fact, you don't get any customization with context menu handlers whatsoever, unless the developer was paid and bothered enough to read most of the documentation above.
To let you tweak context menu settings directly through their app, they have to implement both the handler and the endpoints for handler settings, which are commonly simple registry values. Microsoft hasn't provided any convention for software developers to follow, so you're at the mercy of them providing you with a friendly user interface to tweak the handler.
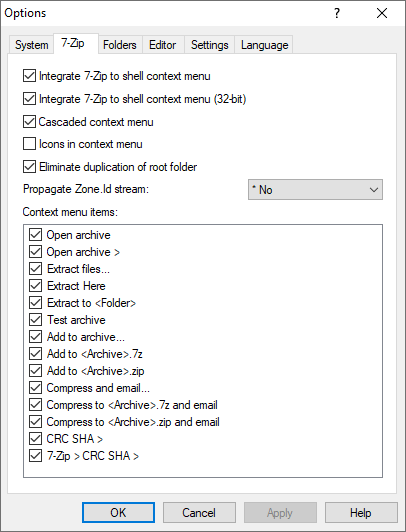
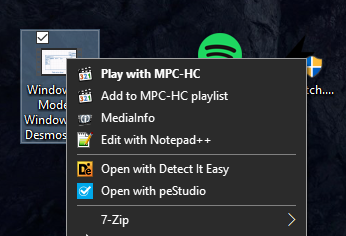
7-Zip serves as a neat example of great software design — the developer here allows you to extensively tweak their handler.
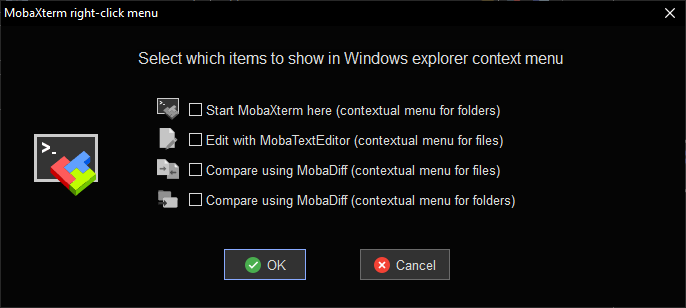
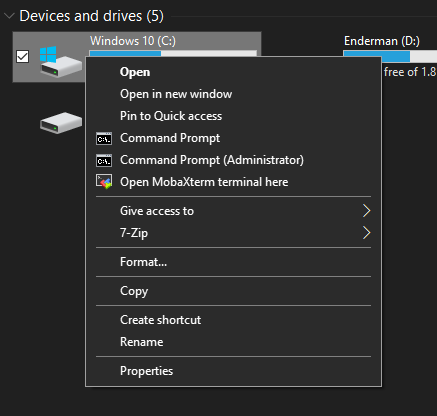
MobaXterm also is an illustrative example of the case where you can customize the shell integration from the application itself. The developers of that software use shell entries instead of context menu handlers, which seems like an odd choice for this case. It seems like someone was underpaid! 😊
In conclusion, there are three types of applications in terms of friendliness towards context menu customization:
- Apps using context menu handlers with customizable settings — the friendliest;
- Apps using shell entries — customizable through registry hacks;
- Apps using context menu handlers without settings — the entries are uneditable.
The first case is the simplest and isn't worth talking about — consult the documentation for the software in question to find all the necessary tweaks. The rest of the cases are discussed in this article.
Shell entries
For starters, all the tweaking happens inside HKEY_CLASSES_ROOT — alias for HKEY_LOCAL_MACHINE\Software\Classes.
That registry key contains all the data about shell components and file extension handlers.
For example, data under the exefile key will exclusively apply to files with the .exe extension.
A trusty old method «companion» viruses utilized back in the day to «accompany» their victims —
the executable (.exe/.com) files was a simple pass-through setup:
the virus executable was specified as the handler for all other executable files.
A belarusian virus from 2005, Neshta.A, worked exactly this way and caused heaps of damage.
Since all the settings inside the HKCR key are divided into types,
editing the context menu for each file type and shell extension manually is unavoidable.
Yeah...
This is abysmal, and, unfortunately, there is no better approach. While you're likely already reconsidering your choices, let me try to pull you back in and explain the basics. That way you can at least tweak the menu for the extensions you work with the most and bring the most noticeable context menu areas up to par...
There are some minor generalizations present in the key. For instance, there are wildcard entries for every file system object, every image, every media file and so on. Nonetheless, Microsoft has taken a horrible approach with the context menu from the beginning. Even though such a disarray always annoyed me, I know full well there's no way for them to fix it now. That's how sometimes life is. We'll tackle the generalized keys a bit later, let's start simple.
General structure
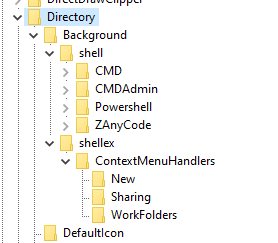
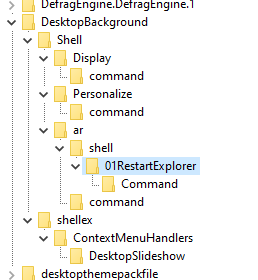
The following figure is what seems to be the general structure of an extension registry key:

The structure may vary for some extensions, but you can almost be sure you're in the right place if the key contains the Shell subkey.
Children of the Shell subkey are the «shell entries» — locally provided customizable entries of the context menu.

Clearing up the confusion
The terminology may be a little confusing, since Microsoft hasn't ever offered a standard nomenclature for the context menu. The article tosses plenty of loose terms around, so here's the nomenclature I have resorted to for better understanding:
- Shell is the Windows Explorer;
- Shell entry is a singular entry within the context menu — the atomic component;
- Shell integration is the general footprint of software within the context menu and may consist of one or more shell entries;
- Shell extension is a general term for a plugin for the Windows Explorer — the context menu handler is a particular case of a shell extension;
- Shell component is a broad term for a component that helps the shell interact with the system — that includes shell extensions, file extensions, protocols, etc.
If this doesn't show how big of a predicament Microsoft is in with the context menu, I don't know what does. I tried my best to keep the technical language as clear as possible. 😒
Editing entries
Locally provided entries always available for a quick and dirty edit are stored under the Shell subkey.
Entries provided by software — the context menu handlers — are stored under the ShellEx subkey.
Since registry key names are case-insensitive by design in Windows, capitalization plays no role. The value names, however, are — keep that in mind, as in some cases it might bite. The context menu doesn't seem to care.
Truly an amazing specification!
Executing entries
A shell entry must contain the command subkey to execute commands.
The default value of the subkey controls execution on click of the shell entry and follows Batch syntax...
to some extent. You cannot have «extended» Batch logic in the entries,
which immeasurably disappointed me, so much so, that I wrote two neat utilities called
quiet and elevatesudo for Windows anyone? for that specific purpose.
No matter how hard I tried, I could not find the exact specification of the incomplete Batch logic the default value uses.
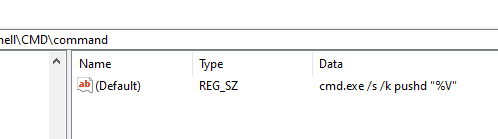
My suggestion is to treat the default command value as raw command line (e.g. Run box),
with an exception to the following two macros:
%1— the absolute file path without quotes
When the shell entry is executed after a right-click onC:\Users\bleh\p.txt, the%1in the context of the command line is equivalent toC:\Users\bleh\p.txt;%V— the absolute directory path without quotes.

Inconsistency
Keep in mind that the %1 macro is the Batch version of argv[1] — the first item in the C argument vector.
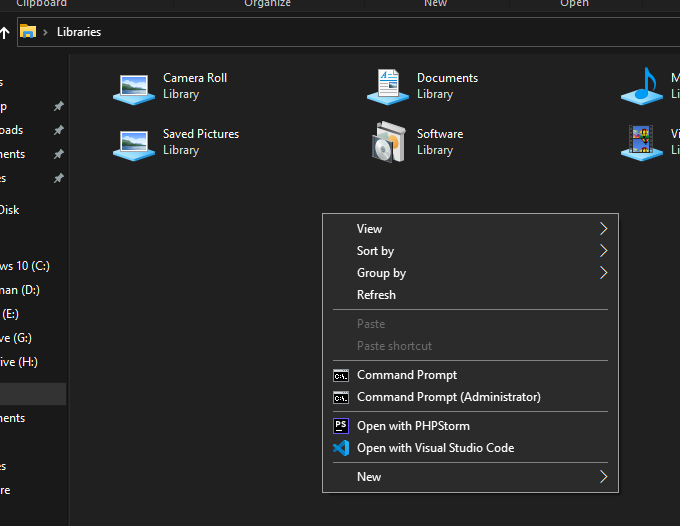
When a context menu is invoked from within, say, a library, the argument vector stops making sense
because a library is a Windows Shell feature, meaning it's sophisticated. Opening a library internally
requires a different API to opening a folder, or even executing a file.
In such cases, the %1 macro does not exist in the context of the command line. This is also likely
the reason why libraries are in a separate category to folders in terms of shell entries.
The directory macro %V also sometimes falls flat depending on the shell entry it's being invoked from.
Brilliant consistency!
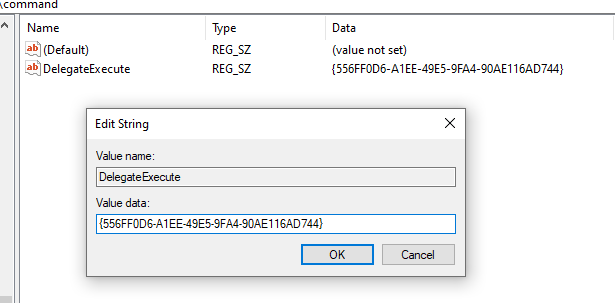
On rare occasions, the default value is left unset, with DelegateExecute alongside it containing a GUID.
When that's the case, the command handler is implemented through the IExecuteCommand COM interface,
and hence cannot be customized by normal means.
Why is that a thing? Ask me a simpler question. It could be a compatibility layer for C, but your guess is as good as mine.
Adding entries
Making new entries isn't as bad as managing existing ones, so I managed to scrabble it into a sort of algorithm, if that makes sense:
- Locate the target extension.
- Careful! Some extensions may be buried within other extensions.
As an example, the Folder Background extension is located under the Folder extension
Directorykey in theBackgroundsubkey. - Navigate to the
shellkey. If there is none, and you're confident there should be, try creating one — chances are high it isn't going to break Windows.(no, seriously) - Create a new key, the name must be alphanumeric. The name is case-insensitive.
- Create the
commandsubkey. - Specify the command line you want to execute on click in the default value.
- The entry should appear in the context menu. If it does not, restart Explorer. If it still doesn't appear, you probably screwed up the procedure — return to step 1. If you verified everything for sure, then the extension is simply not registered in the shell.
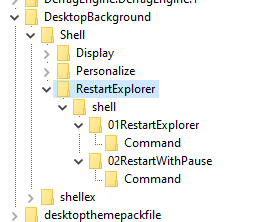
Nesting entries
You can nest entries too!
- Repeat the first 4 steps from Adding entries.
Don't add the
commandkey just yet. - Create another
shellkey. - Inside it, create a subkey called anything else, but
command. - Working within the subkey, repeat steps 5–7.
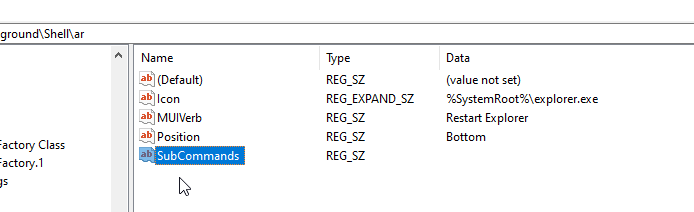
- Navigate back to the root shell entry
- Create an empty
REG_SZvalue calledSubCommands.
It's possible to have an entry include a single nested entry as well.
To control the parent context menu entry, use the outer Shell subkey.
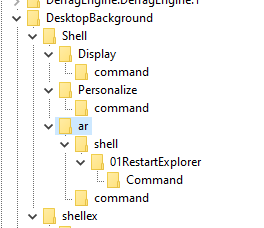
To control its children, use the inner Shell subkeys.
Customizing entries further
There are a plethora of options when it comes to customizing the shell entries. Too bad they're all undocumented. By default, the context menu items borrow their names from the respective shell entries they're owned by.
Name
To override the default name,
you can either use the default value or specify a REG_SZ value called MUIVerb inside the respective shell key
for the shell entry.
MUIVerb takes precedence over the default value.
When it comes to the name, the sky is the limit. Actually, Unicode is the limit. Either way, put in anything you want; it's going to work.
Icon
To enable the icon for your shell entry,
you should use the REG_SZ value called Icon inside the respective shell key for the shell entry.
It uses that unmistakably distinct and clumsy WinAPI resource syntax to specify a direct link to the icon within a file containing resources.
PATH_TO_FILE_WITH_ICON_RESOURCES,INDEX
If you want to select the first icon (in that case, the INDEX part is 0),
the INDEX part can be omitted completely:
PATH_TO_FILE_WITH_ICON_RESOURCES
The following expressions are completely valid and are going to work:
"C:\Windows\system32\cmd.exe"
C:\Windows\regedit.exe
"C:\Windows\explorer.exe",0
C:\Windows\system32\cmd.exe,0
cmd.exe
shell32.dll,3
SHELL32.DLL,10
"C:\Windows\system32\SHELL32.DLL",9
You can omit the quotes and absolute paths depending on the %PATH% variable that unholy concoction of an API uses.
Spoiler: they don't match against the system %PATH%.
Only God knows what paths it's able to parse by default.
C:\Windows and C:\Windows\system32 always work for sure, though.
It's still highly recommended to supply the absolute path, the %PATH% variables of the shell icon picker and the
shell entry do not seem to correspond.

Tip
You can use the Explorer folder icon picker to acquire the icon DLL and visually calculate the offset
of the desired icon.
For instance, the one I selected on the screenshot has an index of 5.
The indexing begins with 0 and ascends in columns.
![]()
It's also possible to pull resource strings from files containing string tables.
Separators
Another integral part of the context menu, which is hardly documented by anyone. Managing them is also rather quirky and takes getting used to. Separators in shell entries are relative to the item they're being enabled for and can overlap without any issue.
Use SeparatorBefore and SeparatorAfter empty REG_SZ values
to add a separator before or after the shell entry being edited, respectively.
Appear in the Shift+Click context menu only
It's possible to «hide» the shell entry from an ordinary context menu right-click. Such a shell entry is called «extended».
Enable that functionality by creating an empty REG_SZ value called Extended inside the shell key for the
respective shell entry.
Hide in safe mode
To disable the shell entry in safe mode,
create an empty REG_SZ value called HideInSafeMode inside the shell key for the respective shell entry.
Never default
The bold context menu item shown at the top is considered to be the default action for the file type. An example of a default shell entry would be «Open» for folders.
There can be no default entry at all, and that's perfectly fine.
To disable the shell entry from becoming default,
add an empty REG_SZ value called NeverDefault inside the shell key for the respective shell entry.
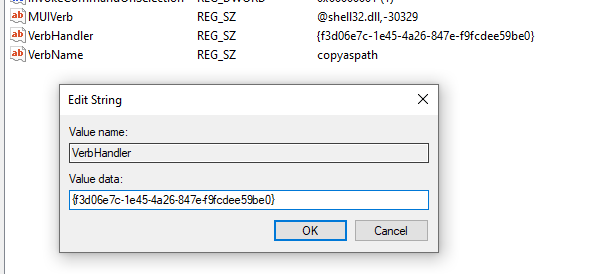
Pass to context menu handler
If there is a context handler available for invocation on shell entry click, it's possible to specify a so-called Verb Handler.
Create a new REG_SZ value VerbHandler inside the shell key for the respective shell entry
and specify the GUID of the context menu handler in the value.

No working directory
Disables the working directory from being added to the environmental path in the context of the application being run.
To disable pass-through of the working directory to the application,
create an empty REG_SZ value called NoWorkingDirectory inside the shell key for the respective shell entry.
Other options
Some options, though might sound obvious, have me scratching the back of my head. Please tag me on Twitter or send a mail my way if you have the knowledge.
A few examples:
CanonicalName;CommandStateHandler;CommandStateSync;Description;VerbName.
Deleting entries
Even simpler — it's the opposite of adding one.
- Locate the target extension.
- Navigate to the
shellsubkey. - Find the shell entry to delete. The default value of the
commandkey will usually contain the executable name, it's best to verify the target application before deletion. - Delete the key.
Multiple shell entries can sometimes correspond to the same item in the context menu, which might result in the item remaining in place despite the deletion.
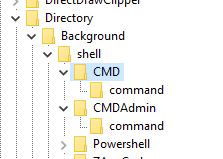
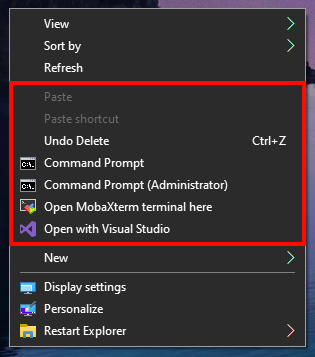
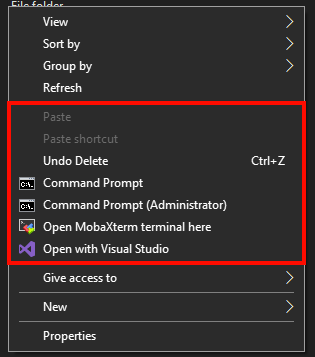
Sorting entries
That's easily the most hilarious procedure of them all. I even tweeted about it.
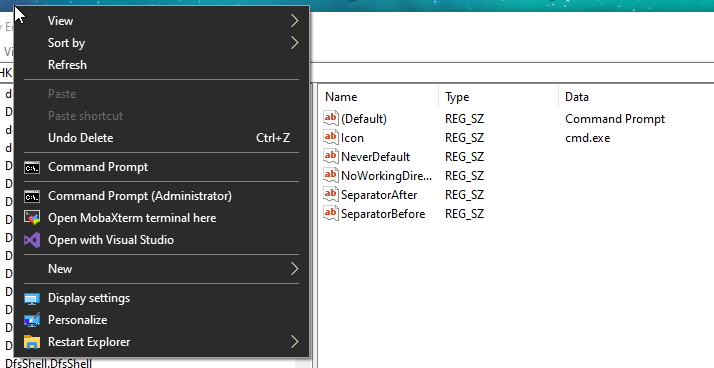
The only way to sort the context menu items is...
by managing the alphabetical order of their respective shell entries in the registry.
Seriously, I am not kidding.
Let the screenshots speak for themselves.
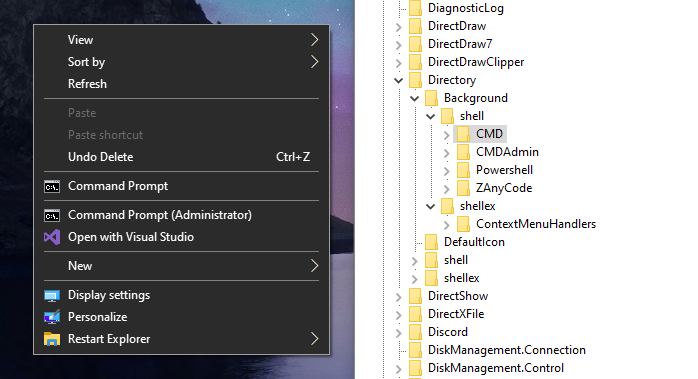
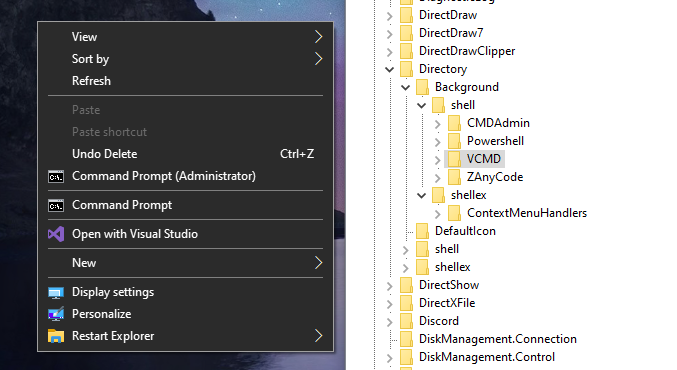
Yeah... I'd rather leave all the obscene comments aside.
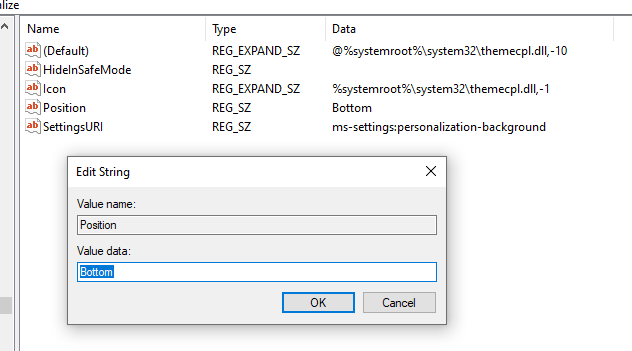
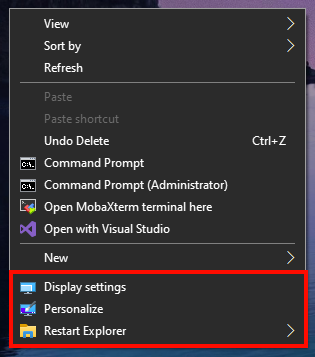
Position override
Another silly feature with a limited number of use cases that's likely been created due to all prior mess Microsoft has created. It's possible to manually override the position of a context menu item to be... either at the very top, or the very bottom. Still doesn't top off the alphabetical sorting between the registry peers...
In the shell subkey under the respective shell entry, create a REG_SZ value called Position.
To enforce the context menu item to appear at the very top,
insert Top into the value data, otherwise insert Bottom.
Sometimes directly enforcing the position happens to be necessary.
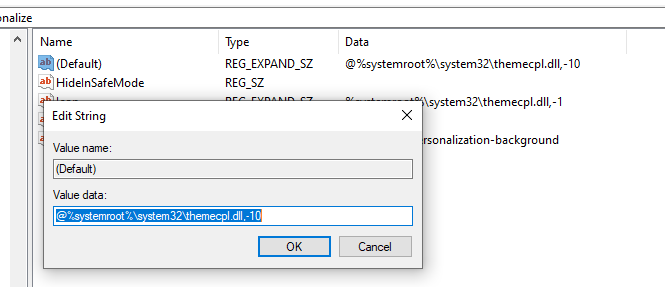
For instance, Microsoft dumps the usual sorting strategy at the very bottom of the context menu,
where the display and personalization settings reside.
They simply set the Bottom position for each of the entries.
What happens when there are multiple shell entries enforced to be in a set position? The alphabetical sorting makes a comeback, it occurs between the shell entries with overridden positions just the same way.
Context menu handlers
Compared to shell entries, there isn't much to be tweaked via registry in context menu handlers.
Their general location is the ContextMenuHandlers subkey under the shellex key in the respective shell entry.
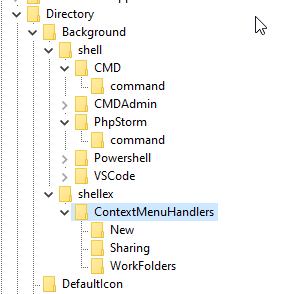
Most of the time, the only piece of data they contain is a lonely GUID of the respective handler.

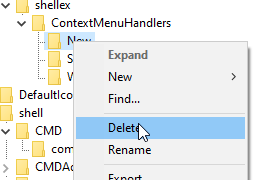
Removing handlers
A context menu handler always directly corresponds to some child under the ContextMenuHandlers key.
Therefore, all that has to be done to remove a handler is removal of the respective child key.
I strongly suggest writing the GUID and the location of the removed entry down somewhere, so that there is a way to roll back any time later.
Adding handlers
Adding a custom handler is complicated. It's not as trivial as adding a shell entry — it requires implementing a handler interface using a language supporting Windows API or an abstraction layer on top of it. C# would be a decent choice precisely for this task.
However, it's just a waste of time to implement a handler for a single shell entry, unless there's software to go along with it. The idea behind context menu handlers is to make native application experience nicer for Windows users.
In other words, Microsoft failed to implement an accessible API for the context menu, so they did what they do best — shifted the responsibility to the developers writing third-party software.
This is how a partial implementation of the IContextMenu interface in C++ looks like:
STDMETHODIMP CShellExtension::InvokeCommand(LPCMINVOKECOMMANDINFO lpcmi) {
    BOOL fEx = FALSE;
    BOOL fUnicode = FALSE;

    if(lpcmi->cbSize == sizeof(CMINVOKECOMMANDINFOEX)) {
        fEx = TRUE;
        if (lpcmi->fMask & CMIC_MASK_UNICODE) fUnicode = TRUE;
    }

    if (!fUnicode && HIWORD(lpcmi->lpVerb)) {
        if (StrCmpIA(lpcmi->lpVerb, m_pszVerb)) return E_FAIL;
    }
    else if (fUnicode && HIWORD(((CMINVOKECOMMANDINFOEX *) lpcmi)->lpVerbW)) {
        if (StrCmpIW(((CMINVOKECOMMANDINFOEX *)lpcmi)->lpVerbW, m_pwszVerb)) return E_FAIL;
    }
    else if (LOWORD(lpcmi->lpVerb) != IDM_DISPLAY) {
        return E_FAIL;
    }
    else {
        MessageBox(
            lpcmi->hwnd,
            "The File Name",
            "File Name",
            MB_OK | MB_ICONINFORMATION
        );
    }

    return S_OK;
}
The InvokeCommand() method is called when a user clicks a context menu item.
I've taken that example from Microsoft.
That whole thing isn't too bad — the logic is far more robust and understandable compared to its surface-level registry counterpart, but it certainly requires getting used to WinAPI.
By definition, it's a requirement to implement interfaces entirely. However, since we're dealing with Microsoft, the «interface» in question is actually an abstract class and can be implemented partially.
The IContextMenu interface has three methods:
GetCommandString()— retrieves the canonical name of the command (optional);InvokeCommand()— handles the command (required);QueryContextMenu()— adds items to the context menu (required).
The IContextMenu interface is the most common one, but there are others,
such as IContextMenu2 and IContextMenu3.
Essentially, this is how the context menu handlers work inside.
While all of this is just a brief overview of the API, you can learn everything about them and more in the Shell Developer's Guide.
Dealing with locked keys
If the registry key is locked, the user you're logged in as is excluded from the ACL.
Commonly, when the key is locked, it's owned by TrustedInstaller.
When that's the case, it's necessary to reclaim ownership of the key to allow making edits to the ACL.
There are plenty of ways to do that, I will list two common ones.
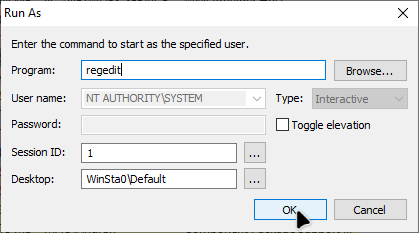
Using external tools
The idea here is to run regedit — the registry editor as the TrustedInstaller user directly.
You can think of TrustedInstaller as the Windows equivalent of root in Unix-like systems —
the superuser.
While Windows generally has more granular control over permissions,
and the idea of having a superuser — the ultimate authority of the system — is less prominent and unannounced,
TrustedInstaller is the closest object to a superuser Windows has.
For those wondering, I've already explained here why «sudo for Windows» makes no sense.
Process Hacker download

Winaero Tweaker download
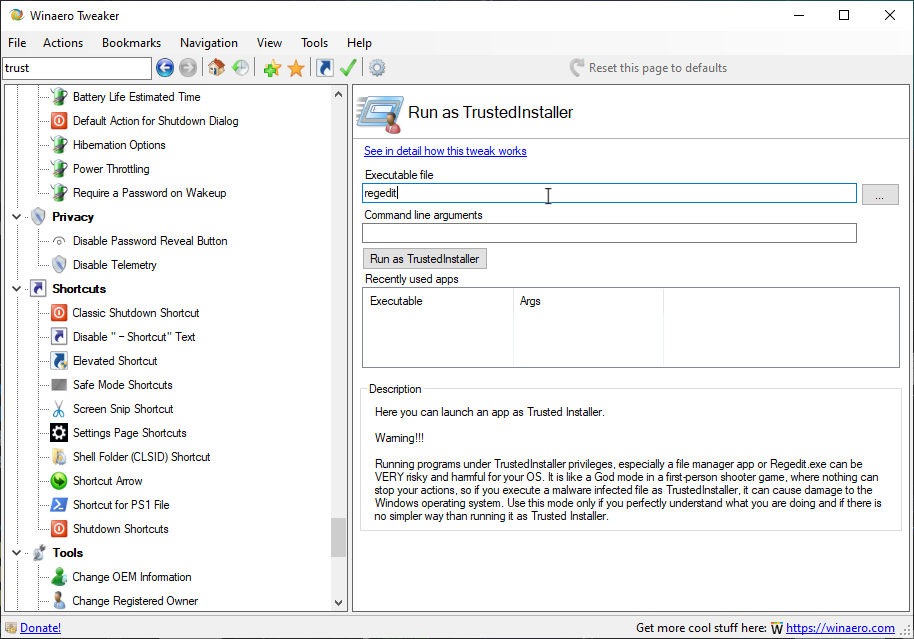
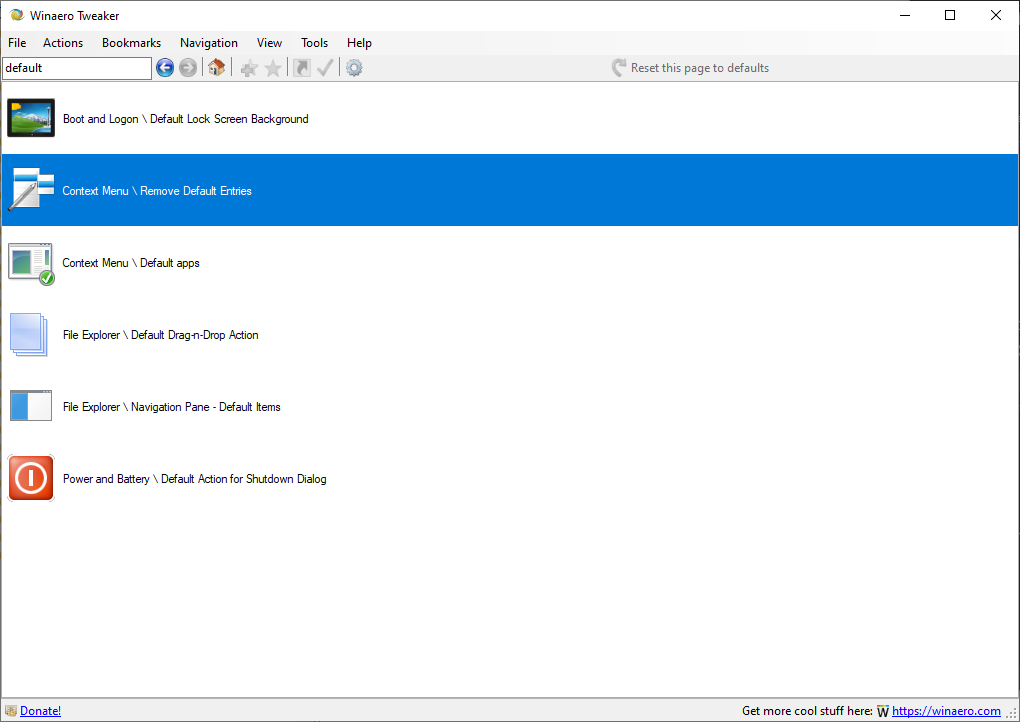
Sergey makes an entirely valid point in his Winaero Tweaker:
Warning!!!
Running programs under TrustedInstaller privileges, especially a file manager app or Regedit,exe can be VERY risky and harmful for your OS. It is like a God mode in a first-person shooter game, where nothing can stop your actions, so if you execute a malware infected file as TrustedInstaller, it can cause damage to the Windows operating system. Use this mode only if you perfectly understand what you are doing and if there is no simpler way than running it as Trusted Installer.
This is exactly the reason I resort to setting permissions manually. It's a bit more time-consuming, but it's safer.
Setting permissions manually
The trusty old way to do it is to manually set permissions for the key.
Once you get the hang of it, it really isn't that difficult.
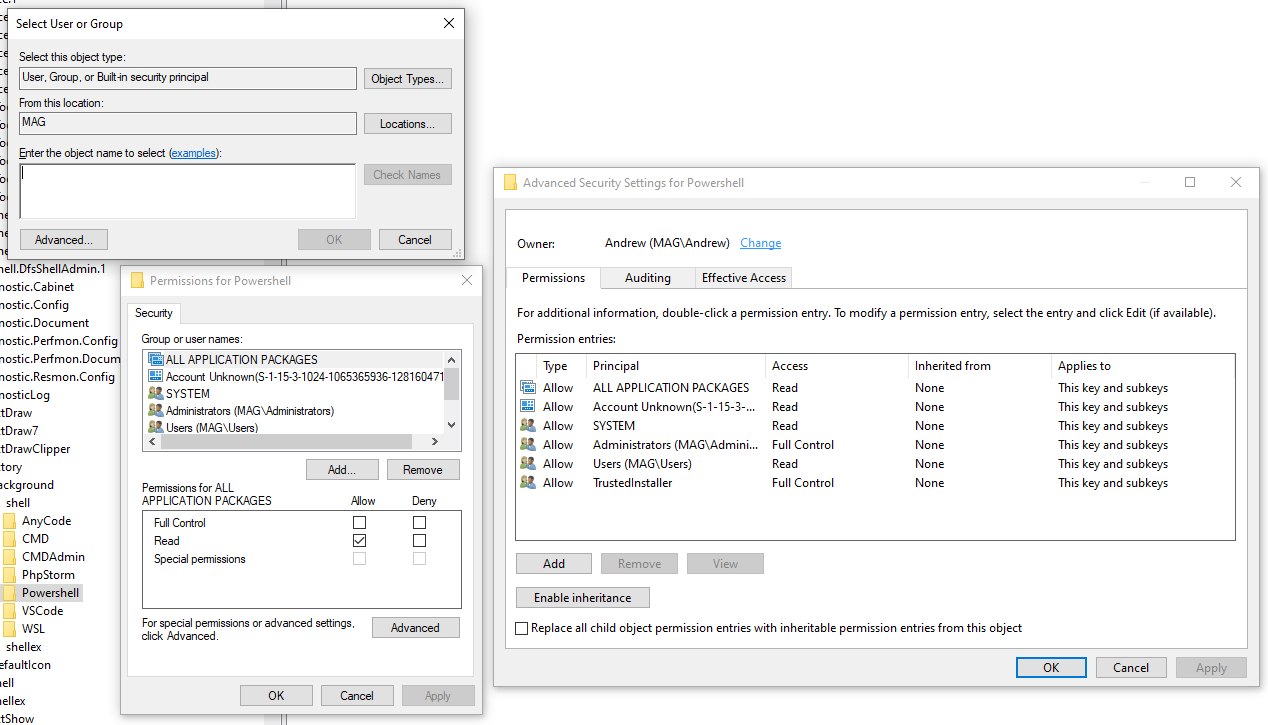
General procedure
- Navigate to the key you want to claim ownership of;
- Open the «Properties» window;
- Head over to the «Advanced» tab;
- The current owner is shown at the top of the «Advanced Security Settings» window. Click «Change»;
- Type out your username in the text area with the «Enter the object name to select (examples)» label;
- Click «OK»;
- Tick the «Replace owner on subcontainers and objects» checkbox;
- Tick the «Replace all child object permission entries» checkbox;
- Click «OK»;
- Pick
Administrators (PC_NAME\Administrators)in the group selector and then tick «Full Control» checkbox in the «Permissions» window at the bottom; - You're done! Click «OK» and dismiss any warnings.
Common registry paths
Here is a list of the most common registry paths.
There are as many «sections» as there are extensions, but these are the most common ones.
They should cover most of your context menu.
Desktop Background — bottom rows
Computer\HKEY_CLASSES_ROOT\DesktopBackground
Folder Background
Computer\HKEY_CLASSES_ROOT\Directory\Background
Folder
Computer\HKEY_CLASSES_ROOT\Directory
Folder Item
Extends Folder.Computer\HKEY_CLASSES_ROOT\Folder
Drive
Computer\HKEY_CLASSES_ROOT\Drive
Library Folder
Computer\HKEY_CLASSES_ROOT\LibraryFolder

Library Background
Inherits from Folder Background.Computer\HKEY_CLASSES_ROOT\LibraryFolder\background
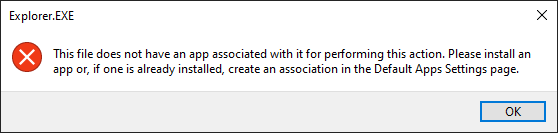
Despite the inheritance, it cannot parse the %V macro, which results in the following error.
Blame Microsoft for being as consistent as ever.
To my knowledge, there is no way to fix that.
All Files
Computer\HKEY_CLASSES_ROOT\*
All Filesystem Objects
Different from All Files — it's a further generalization that includes system drives,
symbolic links and other objects.Computer\HKEY_CLASSES_ROOT\AllFilesystemObjects
File type associations
Text: Computer\HKEY_CLASSES_ROOT\SystemFileAssociations\text
Images: Computer\HKEY_CLASSES_ROOT\SystemFileAssociations\image
Documents: Computer\HKEY_CLASSES_ROOT\SystemFileAssociations\document
Audio: Computer\HKEY_CLASSES_ROOT\SystemFileAssociations\audio
Video: Computer\HKEY_CLASSES_ROOT\SystemFileAssociations\video
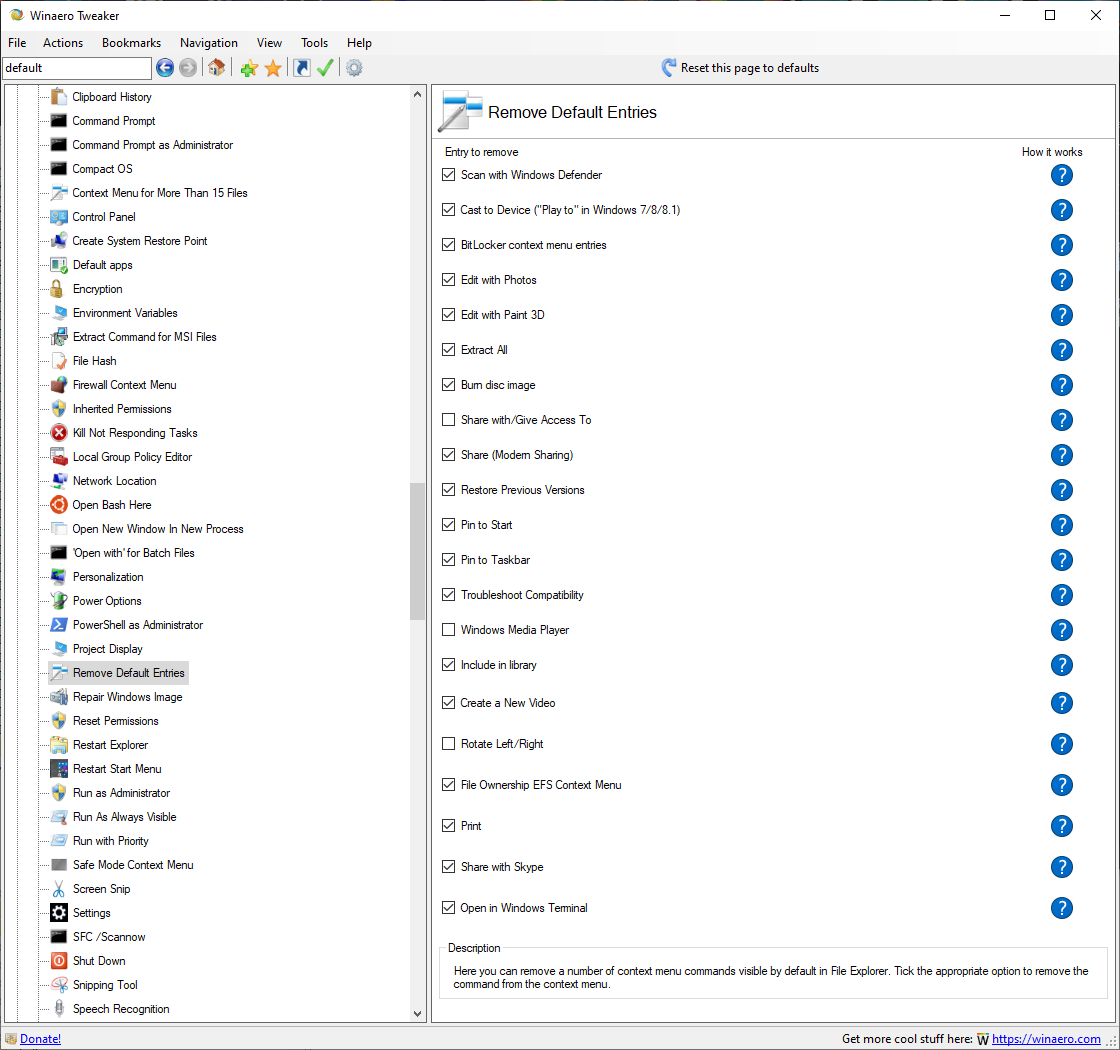
Cleaning up the context menu
The least fan-favorite default entries can be removed using Winaero Tweaker. I suggest using it to make the whole cleanup slightly more bearable.
Some extra common areas
The following are fairly common areas Winaero Tweaker doesn't cover.
Tip
As a rule of thumb, whenever you're dealing with existing shell entries, I really suggest searching for a way to manage them online before resorting to any measures I elaborated on in this article. Now if you can't find anything useful online, then anything works.
Remove «Open PowerShell window here»
- Navigate to
Computer\HKEY_CLASSES_ROOT\Directory\shell\Powershell; - Unlock the key;
- Create a new
REG_SZvalue calledProgrammaticAccessOnlyand leave it empty; - Navigate to
Computer\HKEY_CLASSES_ROOT\Directory\Background\shell\Powershell; - Unlock the key;
- Create a new
REG_SZvalue calledProgrammaticAccessOnlyand leave it empty.
Remove «Open Linux shell here»
- Navigate to
Computer\HKEY_CLASSES_ROOT\Directory\shell\WSL; - Unlock the key;
- Remove the key;
- Navigate to
Computer\HKEY_CLASSES_ROOT\Directory\Background\shell\WSL; - Unlock the key;
- Create a new
REG_SZvalue calledProgrammaticAccessOnlyand leave it empty.
Edit the «Edit» text context menu command
- Navigate to
Computer\HKEY_CLASSES_ROOT\SystemFileAssociations\text\shell\edit; - Replace all mentions of the previous editor in default values with Notepad++ or any other text editor you prefer.
Bottom line
The context menu is a mess, and it's not going to change. It's a part of Windows that's been around for a long time and has been left behind by Microsoft. Shell entries are like differential equations — there's never a general solution. They're a pain to learn, but the acquired skill is worth it.
No matter how terrible the context menu API is in Windows, there's still a way to customize it to your liking. Hopefully you learned something new from this article and are now able to make your context menu a bit more bearable.
Spotted a mistake? Want to add important details I missed or share extra knowledge on the subject? Tag me on Twitter or e-mail me! All contributions welcome. 😉